Showing posts with label urban decay. Show all posts

Monday, July 7, 2014

The Super Wing

Hello lovelies! I'm super excited to say that I have started working for Smashbox Cosmetics. I've always wanted to work for a makeup brand, when I first got into makeup I was really young and I would look at the all the girls working on these beauty counters and be like one day that's me. Sounds so silly, but it feels so good to have a job that I actually love to go to. It's nothing special, but I have to say I'm really enjoying it, alongside my freelance stuff its a great way to learn about new products and trends. One thing I miss when I'm working is the free time I have to take more pics for you guys. Today I woke up and felt like putting on some serious winged eyes, and when I'd finished I felt like it would be an interesting look to show you. It's not an average everyday look, but its nice to wear something a little bold once in a while! So heres out it turned out...


I have to say I felt a bit like a warrior with this winged eyeliner during the day. There's something about bold liner and lips that seems really strong right? I thought it would be cool to add a bit of colour to my inner corner highlight which I got a lot of compliments for at work which is always nice! Seems like our stint here in London of super summer weather is coming to an end, so I'm going to have to find super cool indoor areas to take pics for you guys. I'm really enjoying writing this blog, every post makes me think further out of my box and I have you guys to thank for it!! Anyways, lets get back to makeup shall we, I think this look is great for anyone looking for strong and super bright makeup aside from work I would probably wear this for a party, evening dinner or even out on a night in town. Hope you guys are all well, and if you're enjoying this blog as much as I am writing it, then please follow me on my instagram, twitter, right here on this blog or all three!!!


Shop the Look!

Smashbox Photo Finish Blemish Control Primer
MAC Studio Fix Fluid - NC40
Smashbox High Definition Liquid Concealer - Medium
MAC Prep and Prime Highlighter - Bright Forecast
Smashbox Blush Rush - Heartbreak
MAC Matte Bronzer
Urban Decay Mariposa Palette
Benefit Browzing - Deep
MAC Fluidline - Blacktrack
MAC Zoom Fast Lash - Black
Urban Decay Liner - Peversion
Rimmel London 1000 Kisses Lip Liner - Spice
MAC Retro Matte Lipstick - All Fired Up


Instagram: @makeupbykrishie
Twitter: @krishiee123

post signature
View Post

Wednesday, June 25, 2014

Heroine Chic.

Hello guys!  I've been racking my brains on what post I could write for you all and then it hit me. What better post to do than using the infamous Heroine by MACHeroine is a bright purple matte lip colour created by MAC. Its not something that appeals to everyone, in fact one of my best friends was totally against me wearing it when she saw how it looked. But what I love most about makeup is how much you can experiment with colours no matter how daring or unconventional it can be. I've come up with a wearable daytime makeup look using Heroine so you guys can see just how wearable it is.


Shop The Look!
Makeup Forever HD Foundation - 153
MAC Studio Fix Fluid - NC40
Bourjois Poudre Delice Bronzer - 53
Sleek Blush - Rose Gold
MAC Soft and Gentle Mineralize Skinfinish
MAC Prep and Prime - Bright Forecast 
Rimmel London Eyebrow Pencil
Urban Decay Vice 2 Palette - Smoked (upper line)
L'oreal Infallible 24hr Eyeshadow - 204
Eyelure Katy Perry Kaboom Lashes 
MAC Heroine

I really enjoyed creating this look for you guys because I'm really into my statement lips. I hope you have been able to take something from this post. I can't express how much I am in love with this lipstick, its probably one of those I will be repurchasing again. Now that summer is finally here I definitely think it's time to start being daring with our lip colours so I urge you guys to give Heroine a try!

post signature
View Post

Tuesday, June 17, 2014

The Wedding Guest Tutorial #1


In every culture, summer seems to be that time of year when you'll get all your wedding invitations. Sometimes it's hard to figure out what makeup is suitable for a wedding guest, you don't want to look too made up but at the same time you want to look glamorous. Being asian I have gone for a traditional asian attire for this post, and created a simple makeup look to match. 


I tried to keep the makeup simple but glamorous, so I used three shades of browns from the Urban Decay Vice 2 Palette. The key is to make sure you have one shimmer, one matte and one lighter matte to blend everything together. This is the best way to create a easy smokey eye. Of course you can use more colours to create depth but in this instance I was in a massive rush and so needed to keep things short and sweet. 

I really felt like playing up the pinks in my Sari, its always good to pick colours from your outfit and try and create a element of it this in your makeup hence the pink lips. I've used MAC Supreme Sheen Lipstick in Zen Rose. It's vibrant, but because of its sheerness it doesn't seem so dressed up. Adding lashes really made the whole look stand out, but it's not something that you'll need. The best way to keep things looking polish yet understated is to keep your skin looking as natural as possible. In order to achieve this I used Makeup Forever Face and Body foundation for a sheer finish and only used powder in the t-zone of the face.

So, three tips to help you create your own wedding guest makeup:

1. When doing an eye based makeup, try to keep it to 3 shades of the same colour one matte, one shimmer and one lighter shade.

2. Keep the skin looking as natural as possible

3. Try and incorporate some element of colour in your makeup that matches your clothes


I've really enjoyed writing this talk through tutorial for you, hope it helps. Now that it's wedding season I can't wait to try out lots of colourful outfits and styles. I would love to see what you guys are wearing as wedding guests so comment below! See you guys soon 

post signature
View Post

Thursday, May 22, 2014

The Perfect Red Lip...Part 2

If you've read my previous post on red lipstick you'll know that the best way to choose a colour is by matching you're whole look accordingly. This post will feature my really good friend Nisha, I've used Ruby Woo by M.A.C and I'm going to show you how to match your makeup properly to suit it. 


So as you can see, I've used gold tones on the eyes to brighten the face. The key to matching the lips to your makeup is to make sure the whole look goes well. First red lips go very well with golds and browns. I used a darker brown mixed slightly with black to add some definition. Now this step it so create dimension on the eyes and open up the whole face. When applying a crease colour you should be cautious as to what tones will suit both the lip colour and your initial lid shade. For example, a dark purple along the crease may suit the gold tone on the lid but will clash with the red lip. Its all about look at the whole image. Heavy liner worked well with Nisha because she has big eyes but for a smaller a eye shape you may want to re think this. Here are a list of products I used to create this:

Face:
MAC Face and Body - C6
MAC Studio Finish Concealer - NC 42/ NC 45
MAC Prep and Prime Highlighter - Bright Forecast
MAC Mineralize Skin Finish  - Dark
MAC Lustre Drops - Pink Rebel
MAC Studio Fix Powder - NC 42

Eyes:
Urban Decay Primer Potion
MUA Heaven and Earth Palette - The lighter gold shade
Urban Decay Smoked Palette - Backdoor, Blackout
Urban Decay Liner Peversion
Collection 2000 Liquid Black Liner

Lips:
MAC Beet Lip Liner
MAC Ruby Woo Lipstick


post signature
View Post

Sunday, May 4, 2014

All Bronzed Up.


I'm starting to get a little used to all these makeup poses! If you've ever seen me on a night out you'll know I'm a sucker for bronzed makeup. This is my all time favourite type of look mostly because it can be worn to almost any event. I used two shades of MAC studio finish concealer to create the contoured effect. This is the first time I've used YSL touché eclate and I have to say even though its 25 pounds it's totally worth it. The main focus of this look was keeping the skin natural and contoured. This makeup is good for a night out, dinner date or anything really. I chose to not wear lashes to keep it a bit more natural, but lashes can take it that extra bit further on the glamour spectrum. Also for some reason I wasn't really into using liquid liner this time, but I do think it would compliment this eye makeup really well. I have these moments when I completely go off eyeliner, and then I'm in love with it again haha. Anyways, here's a list of the products I used:

Face:
MAC Prep and Prime Skin Visage Primer
Makeup Forever HD Invisible Foundation - 153
MAC Studio Finish Concealer - NC40, NW45
YSL Touche Eclate - 3
Sleek Blush - Life's a Peach
MAC Lustre Drops - Pink Rebel
Bourjois Delice de Poudre Bronzer - 52
MAC Prep and Prime Finishing Powder 
MAC Studio Fix + (all over face, 2 sprits)

Eyes:
Urban Decay Primer Potion
MAC Cream Colour Base - Quite Natural
Urban Decay Vice 2 Palette -  Smoked, Ambush, Rewind 
MAC Eyeshadow - Tempting 
Urban Decay Naked Palette - Half Baked, Blackout 
Rimmel London Brown Pencil - Dark Brown
MAC Zoom Lash Mascara

Lips:
Rimmel Lip Liner - Tiramisu
MAC Lipstick - Cosmo

post signature
View Post

Sunday, April 27, 2014

How to Do Pigments the Right Way.

Out of everything, I have to say pigments are one of the hardest things to work with. Not only do they seem to fall out everywhere on your face, but precision is something that seems near to impossible when using them. There's a trick to it though, something I've only recently discovered. Most pigments need some sort of mixing agent/glue to stop the specs of pigment from falling everywhere. The perfect product for this is MAC Studio Fix Plus. Its probably the best 14 pounds I spent. It's the most multi-use makeup product out there. The trick is to take some of the pigment on your eyeshadow brush and spritz the spray on the brush from afar. This will act a glue for the pigments to stick to. Then apply the eyeshadow by packing the colour onto the lid to create an intensified look. You'd be surprised how many different tones of colour get lost in your pigment when you don't use this step. Since discovering this method I've played around with some of my pigments and I came up with this super glamorous look using jewel tones.


Products Used:
Face
MAC Studio Fix Fluid - NC35 and NC45 
MAC Studio Finish Concealer - NC40
MAC Lustre Drops - Pink Rebel
Bourjois Poudre de Delice - 53
Sleek Blusher - Rose Gold
MAC Mineralise Skinfinish - Soft and Gentle
Eyes
Urban Decay Primer Potion
MAC Cream Colour Base - Quite Natural
Urban Decay Smoked Palette - Backdoor and Blackout
MAC Fabulousness Warm Eye Palette - Sketch
Collection 2000 Liquid Eye Liner - Black
Urban Decay 24/7 Liner - Blackout
MAC Zoom Fast Black Mascara
Rimmel London Eyebrow Pencil - Brown
MAC Pigment - Green Olive
Lips
Rimmel London Lip Liner - Spice
MAC Lipstick - Please Me
I know it seems like a lot of products, but when doing your makeup determining whether it looks cakey or not is not dependant on how many products you use, more the method with you use them. My advice when doing your makeup is, if its not broken don't fix it. If you have nice skin, embrace it, use a light foundation that highlights your skin and does not cover it. Those of you who have problematic skin, there will be some areas of your skin that are better than others and try allow your skin to show through in these areas. Remember, if your skin looks natural, no matter how dramatic your makeup is it will never look cakey. Hope that helps you guys!
post signature
View Post

Tuesday, April 22, 2014

Candy Yum Yum.


I absolutely LOVE this lipstick by MAC. Its a uniquely vibrant pink that's perfect for both evenings and during the day. I've created a really easy wearable look, keeping the skin dewy and focusing on the lips. I love how it turned out and will definitely be using this throughout summer! 
Heres a list of the products I used:

FACE
MAC Prep and Prime - Skin Visage Primer
Makeup Forever HD Invisible Foundation - 153
MAC Studio Finish Concealer - NC40
MAC Bronzing Powder - Matte
MAC Lustre Drops - Pink Rebel
Sleek Blush - Pixie Pink
MAC Mineralize Skinfinish - Soft and Gentle
MAC Prep and Prime Finishing Powder (only on the t-zone, aim was to keep skin natural looking)


EYES
Urban Decay Primer Potion
MAC Zoom Lash Mascara
Urban Decay Eyeshadow - Midnight Cowboy (inner corner)
Collection 2000 Khol Eyeliner - White (waterline)

LIPS
MAC - Candy Yum Yum


Hope you like this look, comment below with looks that you've created with this lipstick!


post signature
View Post

Thursday, November 7, 2013

Electric Blue.

I know I haven't been posting for a very long time! But its mostly due to the fact that I've started university again and its all gotten a bit hectic. But I'm back with a vengeance haha. 
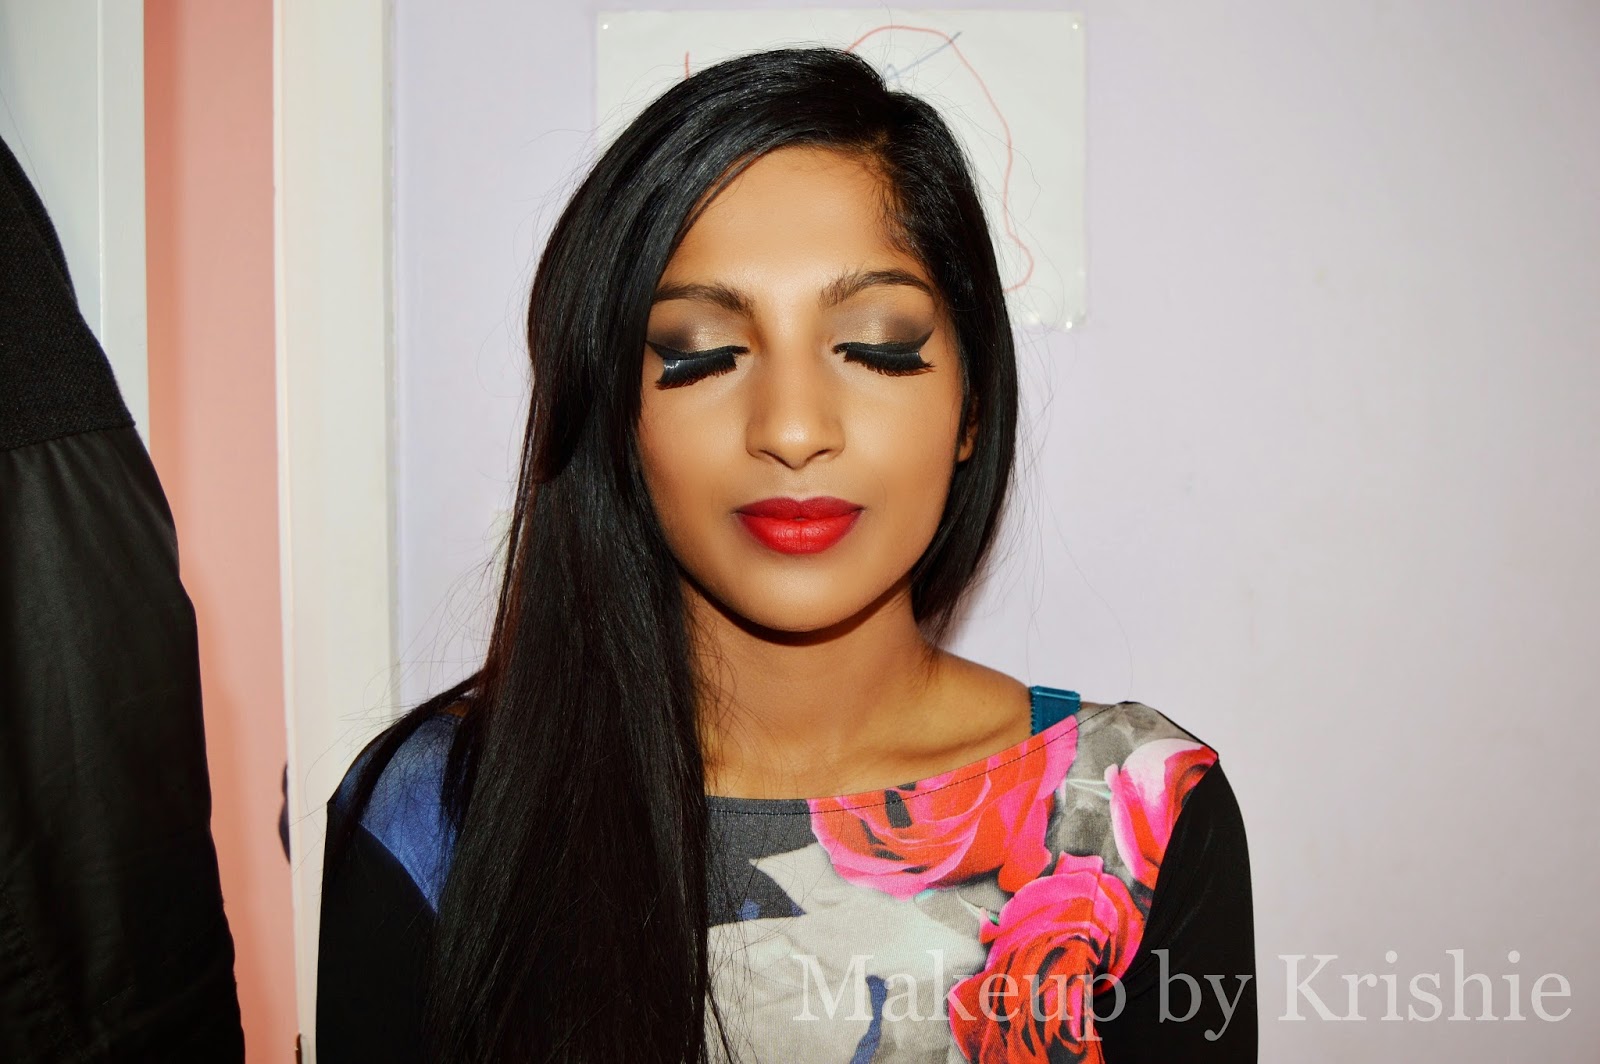
I have always been into smokey eyes, but this time I wanted to try and do something a bit unique. So I used a bright blue eyeliner, and smudged black liner on the outside.


Products Used:

Makeup Forever HD Foundation - 153
MAC Mineralize Concealer - NC35
Bourjois Contour Powder
MAC Lustre Drops - Sun Blush
MAC Mineralise Skin Finish Natural - Medium/Deep

Urban Decay Primer Potion
Urban Decay Smoked Palette - Backdoor (along the brow bone), Blackout (around the edges)
Urban Decay Mariposa Palette - Mushroom (lightly patted on the centre of the lid)
Lime Crime - Electric Blue Eyeliner
Collection 2000 - Liquid liner
Urban Decay 24hr Liner
Topshop Volumising Mascara (surprisingly good!)

MAC Chatterbox Lipstick


Let me know what you guys think below and be sure to what out for more posts!


post signature
View Post
BLOGGER TEMPLATE DESIGNED BY pipdig