Thursday, March 12, 2015

Hot Right Now - Neutral Goddess.


I am loving the taupe trend at the moment! Celebrities such as Olivia Palermo, Kim Kardashian, Gigi Hadid and many more have sported this very neutral chic makeup look from the red carpet to front row at fashion week.I think that this palette of gold, mauves, and brown with lovely natural skin is something anyone can wear. It's simplicity is what draws me to it the most, I can totally see myself wearing this to university as well as for a dinner or something. So I created a mood board type thing using some pictures that really inspired me with this look. It's slightly amateur but gives you guys an idea of where I was going with it!

Rose tones, and colour washed eyes was my favourite aspect of this look, so I used two shadows from the Smashbox Full Exposure Palette; the matte tan brown, and the peach shimmer shade. I wanted my eyes to be the emphasis, so adding liner and mascara really accentuated them without being too dramatic. I softened the eyes by keeping my brows very natural, and adding the same shimmer pink on the tear duct. 
It was important for me to keep the skin looking very natural. All the pictures I took inspiration from showed natural sheen to the skin, and there wasn't any obvious contour or blush colours. To do this I stuck to cream products, I used Chanel Soleil de Tan to add some warmth and dimension to my face. Using Smashbox Halo Highlighter in Gold to add the all important glow and spritz some MAC Studio Fix Plus.
 With the lips I of course I had to use MAC's Taupe lipstick! I added a Smashbox Always Sharp Lip Liner in Nude Medium to give it some extra life. I am obsessed with this colour, think I've been wearing it every day since I did this look!
All in all, I am pretty convinced that this makeup trend is not going anywhere anytime soon. I suspect more and more celebrities are going to embrace their inner neutral goddess on the red carpet in the upcoming months. What do you guys think about this current craze? 
Comment below with your thoughts!
post signature
View Post

Monday, January 12, 2015

Balayage with Nicky Lazou..

Hey guys! I know it's been such a long time since my last post. I can't do anything more than apologise for my lack of consistency on here but I've made a promise to myself that I'll be more regular on here this year so watch this space!
So I wanted to start the new year with a change, I've always been attracted to multi tonal hair and stumbled across Nicky Lazou's instagram page a while ago. I was truly impressed by how every single client picture she put up had literally the most amazing looking hair and the before and after shots left me in awe! I knew if I was ever going to get my hair done it had to be with someone that I knew would be able to do it properly. I've had experiences in the past at salons that have left me with brassy hair which is definitely not a desirable look. After plucking up enough courage I got myself booked in for the 6th of January.
Nicky Lazou is a home based experience, which I prefer. I always find in salons you tend to feel like you're rushed for time or you don't have the stylist's full attention. So at the start of the appointment Nicky went through what she wanted to do with my hair. After seeing all her work it seemed pretty easy to trust her judgment. There was only myself and another client in the room which meant Nicky was able to concentrate on my hair without any distractions. Nicky was such a lovely person from the start I felt so welcome in her home it was really such a laugh.
Nicky is famous for her balayage technique, she understood that my hair being naturally very dark needed a lot of work to be brightened and took the care and time to create the results I was looking for. I was actually there for almost 4 hours but it didn't feel like it all and Nicky was happy to wait until my hair was ready. 
Not only did she colour my hair but she also gave me lots of advice on how to care for it as well as styling techniques. I didn't feel like she was pushing her products on me which is another thing I despise at hair salons. She was also kind enough to clip my hair up for me to make sure it looked nice when I went out that evening.

Here are a few pictures of my hair before:

Here are a few pictures of my hair after (where taken from my phone so quality won't be amazing):


All in all I had such a fun experience going to Nicky. She has excellent knowledge in colouring hair and didn't make me feel uncomfortable or unsatisfied at any stage of the hair appointment. Since getting my hair done I have received so many compliments from friends and family and I can't be more pleased. I will definitely be going back to her again.
If you would like to get your hair done by Nicky then you can email her at info@nickylazou.com and don't forget to visit her Instagram page: @nickylazou

post signature
View Post

Wednesday, September 3, 2014

Wedding Guest Makeup #2

Hello guys, I am back again with another Wedding Guest Makeup look. I had the pleasure of doing my beautiful cousin's makeup for a wedding she attended last weekend and it seemed like the perfect opportunity for a blog post. Now you guys all know how much I love creating makeup looks for weddings and other ethnic events I attend and I really enjoyed creating this makeup look for my cousin. I think it's definitely a makeup look that will cater to all you naturalists out there who love your golds and nudes, below are a couple pictures of how it turned out...

As you can see, it's a fairly natural look compared to my last Wedding Guest Makeup post which you can have a look at here. I primarily used the Smashbox Full Exposure palette for the eyes because it's a fantastic palette for glamorous neutral eyes. My cousin Paula has lovely big eyes, so I wanted to enhance these by adding a nice feline flick with MACs Fluidline Liner. This is a perfect gel liner to use for long events because it literally don't budge once it's on. I kept the skin really natural by using a light foundation and adding a plum/rose blush to enhance the warmth in her skin. Needless to say she was ecstatic with how it turned out as was I!

 This is a great look to try for those of you who don't want anything too dramatic. I have focused on golden tones for the eyes making this an ideal makeup for warmer skin tones. It's a simply easy makeup look which I hope you guys will try out. This was a fairly quick post for you guys which I hope you have enjoyed, stay tuned for my next post on Autumn makeup looks which will be up sometime next week!!
post signature
View Post

Monday, September 1, 2014

The Pin Up Girl.


The 1950's brought us beauty icons like Marilyn Monroe and the era of Pin Up with a very distinctive makeup look. Pin Up makeup has lived way beyond the years of it's icons through famous celebrities such Dita Von Teese. I have to say it is one of my most favourite makeup looks and for some reason I always seem drawn to creating it when I'm wearing an all black outfit.
There's a lot of history that comes with the Pin Up look. In the 1950's it was a movement of entertainment and sexuality really. But what's left of it today is the lifestyle and fashion these Pin-Up girls would follow. Unlike other iconic makeup looks, the Pin-Up has a natural, flirtatious appeal. There isn't a lot of intricate skill involved apart from the famous feline flick which was later transformed into something more demure by stars such as Audrey Hepburn
Dita Von Teese's signature makeup resembles iconic Pin Up style. Arched brows, red lips and rosy cheeks are key aspects of the original Pin Up makeup. 

Marilyn Monroe almost always sported this sexy makeup which heavily inspired later interpretations of Pin Up Makeup.
I have created my version of the Pin Up makeup look on my beautiful friend Nisha here below for you guys to check out. 


As you can see I have kept the makeup as authentic as possible. I have used colours the suit the skin tone of my model. Typical Pin Up makeup has rosy cheeks but I felt the bronzed cheeks would suit the shape of my model's face better. I have heavily used highlight to keep the dimensions of the face as structured as possible and of course MAC's Ruby Woo was the only red I could think off when I thought of Pin Up. Ruby Woo is that perfect hollywood red, it looks striking on literally any skin shade! All in love this is always a makeup look that I will love and enjoy creating, but I hope this post has been interesting for you guys. I will link all the products I used below for you guys to see. If you guys have seen my Instagram post recently you'll know this look is part of a project I have just finished. I'm really excited about this and I will explain more about what I have been up to in the upcoming few weeks so make sure to keep an eye out!! 
Shop The Look!
MAC Studio Fix Fluid - NC42 & NC45
MAC Studio Finish Concealer - NC42 & NW40
MAC Prep and Prime Highlighter - Peach Lustre & Bright Forecast
MAC Soft and Gentle Mineralize Skin Finish (no longer available in MAC)
MAC Lustre Drops - Pink Rebel
MAC Bronzing Powder - Matte Bronze
MAC Fluidline - Blacktrack
MAC Lip Liner - Cherry
MAC Retro Matte Lipstick - Ruby Woo
Smashbox Full Exposure Palette
Smashbox Eye Brightening Mascara
Rimmel London Brow Pencil - Dark Brown
Sleek Blush - Rose Gold & Life's a Peach
Eyelure Katy Perry Lashes - Feline Fierce

PS. My beautiful model Nisha does her own fashion blog which is really cool, you can check it out HERE guys! xxxx
post signature
View Post

Tuesday, July 22, 2014

The Kim K Glow.


Hey guys! I just want to start of by apologising for my absence on here the past couple of weeks I've had so many deadlines to meet for university but now it's finally finished I can actually enjoy the summer! So I am a massive fan of Kim Kardashian's makeup, I love how her skin always looks glowing and polished and it's something I like to practice myself particularly on a night out. I have to say this isn't a natural look, I've use more products than what I usually use but it's a great look for a glamorous night out. The picture below is the pic I went by mostly to recreate her makeup, I went by a couple of pictures but this one was the only one I saved. 

Here's how the look turned out..


As you can see, its a super glam makeup look. I used Smashbox BB Cream Eyes concealer to contour and highlight. I just find the consistency of the product is lovely and creamy so it blends beautifully into the skin. 

A few tips I would give to anyone trying to contour and highlight is;
- start with cream products and set with powders for a more natural finish
- blend highlight colour down and contour colour up, so that they eventually meet 
- blend, blend, blend!! -  the more you blend the more natural it will look. 

I also added MAC's Soft and Gentle Mineralize Skinfinish on top of the highlight to create an extra glow. Kim uses a lot of neutral colours and the eyes and always have some form of false lashes on. To emulate this, I have added a pair of Katy Perry - Feline Fierce lashes on which I have to say I am pleasantly surprised by! I wore them to work a couple of times and have received so many compliments from customers and my friends. To top it all off I put some nude gloss on the lips because glossy nude lips are a trademark Kim special. This kind of makeup is really up my street and I've really enjoyed creating it. I am currently working on youtube videos at the moment and will be posting one up in the next couple of months. Hope you guys liked this look and are enjoying your summer!

Shop The Look!

Smashbox Studio Skin 15 Hour Wear Foundation - 3.15
Smashbox Photo Finish Blemish Control Primer 
Smashbox BB Cream Eyes - Light & Dark
MAC Prep and Prime Highlighter - Bright Forecast
MAC Soft and Gentle Mineralize Skinfinish
Sleek Blush - Rose Gold
Bourjois Delice de Poudre Bronzer - 53
MAC Prep and Prime Pressed Powder
MAC Studio Fix Plus
Sleek Garden of Eden Palette
Urban Decay Smoked Palette - Backdoor
MAC Temptation Eyeshadow
MAC Fluidline Blacktrack
MAC Zoom Fast Black Lash
Rimmel London Lip Liner - Tiramisu
MAC Lipstick - Honey Love
Bobbi Brown Lipgloss - Pink Seashell

post signature
View Post

Monday, July 7, 2014

The Super Wing

Hello lovelies! I'm super excited to say that I have started working for Smashbox Cosmetics. I've always wanted to work for a makeup brand, when I first got into makeup I was really young and I would look at the all the girls working on these beauty counters and be like one day that's me. Sounds so silly, but it feels so good to have a job that I actually love to go to. It's nothing special, but I have to say I'm really enjoying it, alongside my freelance stuff its a great way to learn about new products and trends. One thing I miss when I'm working is the free time I have to take more pics for you guys. Today I woke up and felt like putting on some serious winged eyes, and when I'd finished I felt like it would be an interesting look to show you. It's not an average everyday look, but its nice to wear something a little bold once in a while! So heres out it turned out...


I have to say I felt a bit like a warrior with this winged eyeliner during the day. There's something about bold liner and lips that seems really strong right? I thought it would be cool to add a bit of colour to my inner corner highlight which I got a lot of compliments for at work which is always nice! Seems like our stint here in London of super summer weather is coming to an end, so I'm going to have to find super cool indoor areas to take pics for you guys. I'm really enjoying writing this blog, every post makes me think further out of my box and I have you guys to thank for it!! Anyways, lets get back to makeup shall we, I think this look is great for anyone looking for strong and super bright makeup aside from work I would probably wear this for a party, evening dinner or even out on a night in town. Hope you guys are all well, and if you're enjoying this blog as much as I am writing it, then please follow me on my instagram, twitter, right here on this blog or all three!!!


Shop the Look!

Smashbox Photo Finish Blemish Control Primer
MAC Studio Fix Fluid - NC40
Smashbox High Definition Liquid Concealer - Medium
MAC Prep and Prime Highlighter - Bright Forecast
Smashbox Blush Rush - Heartbreak
MAC Matte Bronzer
Urban Decay Mariposa Palette
Benefit Browzing - Deep
MAC Fluidline - Blacktrack
MAC Zoom Fast Lash - Black
Urban Decay Liner - Peversion
Rimmel London 1000 Kisses Lip Liner - Spice
MAC Retro Matte Lipstick - All Fired Up


Instagram: @makeupbykrishie
Twitter: @krishiee123

post signature
View Post

Friday, July 4, 2014

Daytime Smoke.

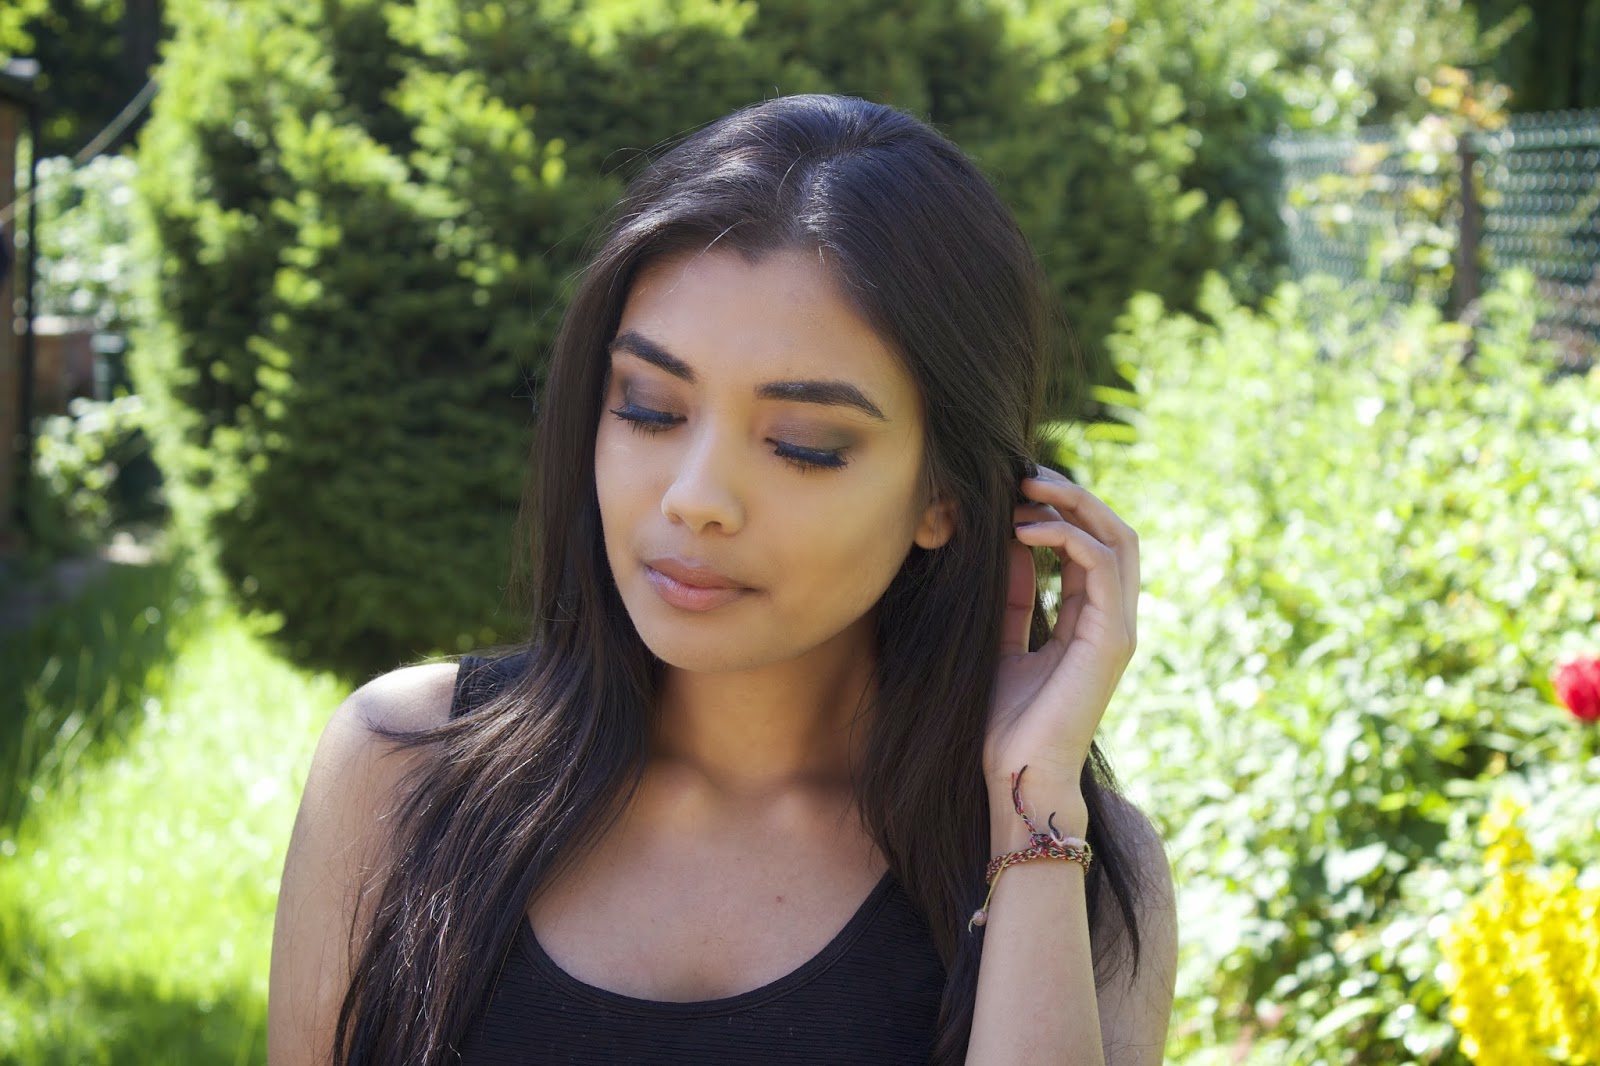
Hello lovelies! Sorry for my lack of post recently been trying to come up with something a little different for you guys. I've been doing a lot of dramatic out there makeup recently, so I thought it would be nice to show you guys something more toned down and easy to wear for this summer heat. I have found myself drawn more to bb creams than foundations at the minute so it was interesting to try creating a photo friendly makeup look using high spf products. Everyone loves a smokey eye, but it's difficult to do during the day without looking like a racoon. Here's my version of a daytime smokey eye using matte browns an greys.


As you guys can tell it's not a look you've seen me do before! I kept everything really earthy and natural by using a lot of cream based products and using a translucent powder to set it all. To create a subtle shimmer to the eye I started by using MAC's Mooncake Paintpot. When I added colours on top of this there was this shimmery depth to my eyes which I thought looked great in the sun. On a side note, I have found this amazing new product for my hair. Who else loves that second day, messy hair look that is so hard to recreate without looking like a birds nest? Well for all of you out there that likes it as much as me, you need to try Bumble and Bumble's City Swept Hairspray. It's one of the most unique products I've tried! You spritz it into your hair, and start playing around with it until you're happy and you'll see that your hair looks super volumized!! I used it here so you guys can see how effortless it is. 
As usual I have added lashes to the look, but you can always choose against them if you like. Smokey eye is all about the blending. So its a good idea to invest in a couple of nice brushes that you can always reach to. Real Techniques and Zoeva brushes are good quality and pretty affordable too so it's worth checking them out! Remember the 3 Step Tip from the Wedding Guest Makeup? It's the same method every time, just different colours. Daytime tones are usually mattes and toned down shimmers, but there are no rules guys go as crazy as you want! Hope you liked this look guys, comment below and let me know if you have any suggestions on posts you'll want. Don't forget to subscribe and you can follow me on other social medias which I shall link below. Take care and Enjoy the sunshine!!
Shop The Look!

MAC Prep and Prime BB Cream - Dark
Smashbox Blemish Control Primer
MAC Studio Finish Concealer - NC40/NW44(contour)
Smashbox Halo Hydrating Perfecting Powder - Light/Neutral
Bourjois Poudre De Delic Bronzer - 53
MAC Mineralize Skinfinish - Soft and Gentle
MAC Prep and Prime Highlighter - Bright Forecast
MAC Painpot - Mooncake
Urban Decay Eyeshadow - Backdoor, Smoked 
MAC Eyeshadow - Amberlights
MAC Khol Power Eye Pencil - Orpheus
L'oreal Volume Millions Lashes - Black
Eylure Volume Lashes - 110
Rimmel London Lip Liner - Tiramisu
Bobbi Brown Lip Gloss - Pink Seashell
Instagram - @makeupbykrishie
Twitter - @krishiee123
post signature
View Post
BLOGGER TEMPLATE DESIGNED BY pipdig